
Apartment Soundproofing: Engineering Guide to Noise Isolation & Tested Assemblies
An architectural guide to apartment acoustics: tested assemblies (USG/ASTM/ISO), mechanical decoupling, floating floors, wall systems, and lab vs. field performance.
Neighbor noise remains one of the primary sources of dissatisfaction in multi-family residential buildings across the United States, Canada, the United Kingdom, and Europe. Whether you live in a reinforced concrete high-rise, a steel-framed condominium, or a light wood-framed multi-family structure, acoustic privacy requires an understanding of building physics.
In residential construction, sound isolation cannot be solved with superficial fixes. Adhesive foam panels, thin cork rolls, and generic "soundproofing paints" do not alter the transmission loss of a structural partition. Effective acoustic remediation requires treating the building element as a complete, tested assembly based on mass, cavity depth, resilient decoupling, and strict airtightness.
This guide details the physical principles of architectural acoustics, clarifies the distinction between laboratory ratings and real-world apartment performance, compares tested wall and floor assemblies (USG, UL, ASTM, ISO), and identifies the critical failure points on active jobsites.
1. Acoustic Fundamentals: Airborne, Impact, and Flanking Noise
To design an effective acoustic partition, you must identify how sound energy travels through the building structure:
| Noise Category | Transmission Mechanism | Common Residential Sources | Standard Metrics |
|---|---|---|---|
| Airborne Noise | Sound waves radiate through air, exciting structural surfaces into vibration. | Voices, television, audio systems, pet barking | STC (ASTM E90) / Rw (ISO 717-1) |
| Impact Noise | Direct mechanical impact against floors or walls creating vibrational waves. | Footsteps, dropped objects, dragging furniture | IIC (ASTM E492) / Lnw (ISO 717-2) |
| Flanking / Structural | Vibrations bypass primary partitions via continuous slabs, joists, studs, ducts, or pipes. | Elevators, plumbing risers, HVAC compressors, subwoofers | Evaluated in field tests (ASTC / AIIC) |
North American vs. European Acoustic Standards
Acoustic ratings vary across international building codes:
- Airborne Sound:
- STC (Sound Transmission Class — ASTM E90 / E413): The North American single-number rating covering 125 Hz to 4,000 Hz. It measures the transmission loss of interior walls, floors, and ceilings.
- Rw (Weighted Sound Reduction Index — ISO 717-1 / DIN 4109): The European and international metric covering 100 Hz to 3,150 Hz. While numerical values of STC and Rw for a given wall often fall within 1–3 points of each other, they use different reference curves and calculation methods. They are distinct standards and should not be treated as interchangeable.
- Impact Sound:
- IIC (Impact Insulation Class — ASTM E492 / E989): The North American metric for floor-ceiling assemblies. Higher numbers indicate superior impact isolation. International Building Code (IBC Section 1206) generally requires a minimum laboratory STC/IIC of 50 (or field ASTC/AIIC of 45).
- Lnw (Normalized Impact Sound Pressure Level — ISO 717-2): The European metric. Lower decibel values indicate superior performance (less sound transmitted to the room below).
Important
STC is a System Rating, Not an Absolute Decibel Guarantee
An assembly with a laboratory rating of STC 55 does not mean that every sound will be reduced by 55 dB across all frequencies. STC evaluates performance against a standardized frequency curve representing typical speech. It does not heavily weight low-frequency rumble (below 125 Hz), such as home theater subwoofers or heavy mechanical equipment.
2. Laboratory Ratings vs. Real-World Apartment Performance
One of the most frequent misconceptions in residential soundproofing is assuming a laboratory rating translates directly into field performance.
- ASTM E90 & ASTM E492 measure partitions installed in specialized laboratory chambers where all perimeter flanking transmission is physically suppressed.
- ASTM E336 & ASTM E1007 measure actual field performance (ASTC / AIIC) inside completed buildings.
In multi-family buildings, field ratings typically measure 5 to 10 points lower than published laboratory ratings. This degradation occurs because sound takes indirect paths: vibrating adjacent drywall partitions, traveling through continuous floor decks, or leaking through back-to-back junction boxes and HVAC penetrations.
3. The Core Rule: Choose a Tested Assembly, Not Miracle Materials
Acoustic performance is not determined by a single proprietary material. It is governed by how six fundamental physical principles interact in an assembly:
Acoustic Performance = Mass + Cavity Depth + Cavity Absorption + Mechanical Decoupling + Airtightness + Flanking Control
- Mass: Heavy, dense layers (e.g., 5/8" / 15.9 mm Type X gypsum board or gypsum fiberboard) reflect sound waves and resist vibration.
- Cavity Depth: Increasing the air space between decoupled faces lowers the natural mass-air-mass resonance frequency of the partition.
- Cavity Absorption: Open-porous fibrous insulation (acoustic mineral wool or sound-attenuation fiberglass batts, approx. 2.0–4.0 lbs/cu ft or 30–60 kg/m³ with airflow resistivity Rf ≥ 5 kPa·s/m²) dampens cavity resonance and absorbs sound energy bouncing within the framing.
- Mechanical Decoupling: Physically breaking the direct mechanical connection between wall faces (via resilient channels, isolation clips, or independent stud rows) prevents structural vibration transfer.
- Airtightness: Continuous elastomeric acoustic sealants eliminate air leaks. Because sound travels through any path that air can take, unsealed perimeter joints compromise the assembly.
- Flanking Control: Isolating junctions at floors, ceilings, and intersecting walls prevents vibration from traveling around the treated partition.
Examples of Tested Wall Assemblies (Published Laboratory Benchmarks)
Major manufacturers (such as USG, National Gypsum, and Saint-Gobain) test full assemblies under standardized ASTM E90 conditions:
- Standard Baseline Partition (STC ~34–38): Single 2x4 wood or 25-gauge steel studs, one layer of 1/2" regular gypsum board on each side, empty cavity. Voice conversations are clearly audible through the wall.
- Insulated Staggered Assembly (STC ~45–48): 25-gauge steel studs, 3-1/2" mineral wool cavity insulation, one layer of 5/8" Type X drywall on each side. Loud speech is muffled but audible.
- Decoupled Resilient Assembly (USG Design / STC 52–58): Steel stud framing, cavity mineral wool, resilient sound isolation channels or clips on one side, and two layers of 5/8" Type X gypsum board with staggered joints and full perimeter acoustical caulk. Speech is generally unintelligible.
Note: These ratings apply exclusively to the complete tested system under laboratory conditions. Modifying framing gauge, screw spacing, cavity depth, or fastener type alters the system rating.
4. Wall Soundproofing: 3 Engineering Levels
When upgrading an existing wall or building a new partition, select an approach based on available room depth, budget, and acoustic objectives.
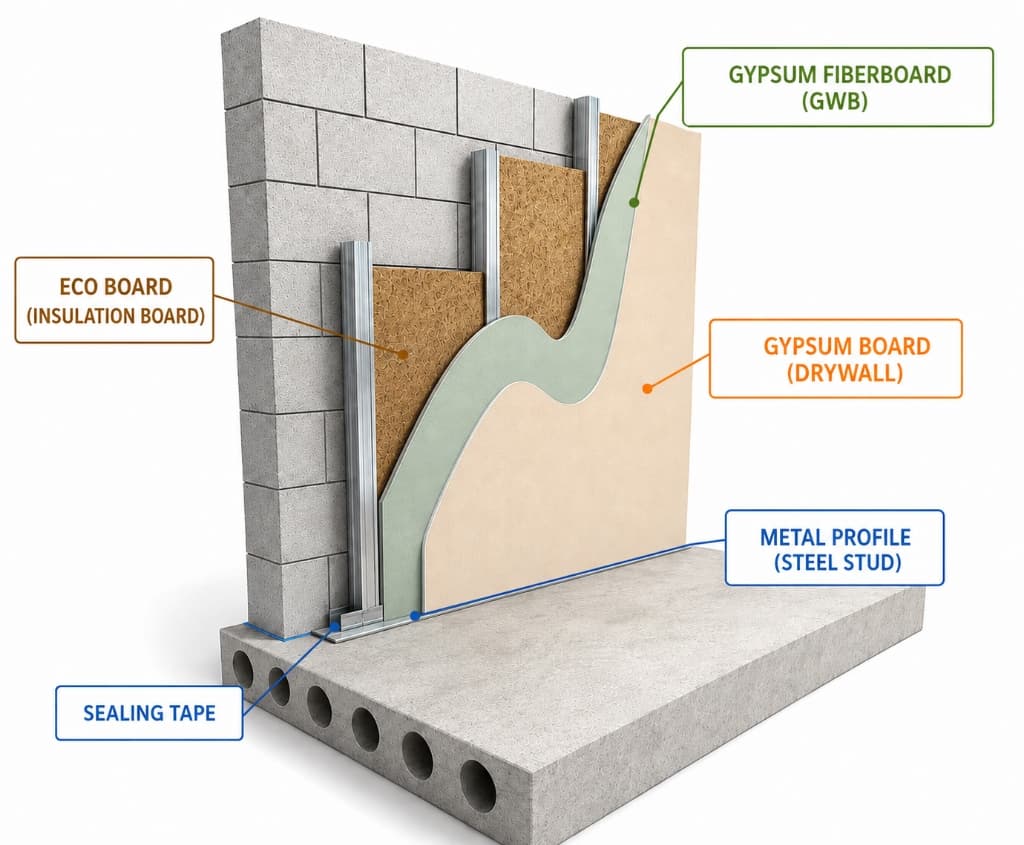
The High-Performance Acoustic Wall Stack (inside-out installation sequence):
- Structural Wall & Subfloor Slab: Mass concrete, block, or existing framing decoupled from the new interior lining.
- Sealing Tape: Continuous resilient closed-cell acoustic foam strip decoupling perimeter steel tracks from floors, ceilings, and walls.
- Metal Profile (Steel Stud): 2" (50 mm) C-channel studs mounted decoupled with an air gap or on resilient clips.
- Eco Board (Insulation Board): Sound-absorbing acoustic mineral wool cavity insulation.
- Gypsum Fiberboard (GWB): Dense high-mass first sheathing layer (1/2" or 5/8").
- Gypsum Board (Drywall): Soundproof drywall outer layer with staggered seams and non-hardening acoustical sealant.
Level 1: Low-Profile Resilient Upgrade
- Best suited for: Moderate airborne noise (conversations, standard TV volume) where floor space loss must be minimized.
- Assembly:
- Existing wall partition.
- Resilient channel (RC Deluxe / RC-1 Pro) installed horizontally across studs at 24" (610 mm) o.c., or low-profile sound isolation clips.
- Mineral wool or fiberglass batts placed in the cavity where access allows.
- One or two layers of 5/8" (15.9 mm) Type X gypsum board fastened strictly to the resilient channels.
- Acoustical sealant at all perimeters and penetrations.
- Added Thickness: 1.0" to 1.75" (25–45 mm).
- Main Limitation: Highly vulnerable to installation errors. If a single drywall screw penetrates through the resilient channel into the stud behind it, the channel is "short-circuited," eliminating much of the decoupling benefit.
Level 2: Independent Stud Wall
- Best suited for: Shared condo party walls and high-volume residential noise.
- Assembly:
- Existing party wall.
- True 1/2" to 1" (12–25 mm) air gap with zero mechanical ties to the existing wall.
- Independent light-gauge steel stud framing (2-1/2" or 3-5/8" / 64 mm or 92 mm) anchored only to floor and ceiling via perimeter isolation tape.
- Cavity insulation (mineral wool or sound attenuation fiberglass batts).
- Two layers of 5/8" (15.9 mm) Type X gypsum board with overlapped, staggered seams.
- 1/4" perimeter gap sealed with non-hardening acoustical caulk.
- Added Thickness: 3.5" to 5.0" (90–125 mm).
- Main Limitation: Requires giving up 4 to 5 inches of perimeter room depth along the treated wall.
Level 3: High-Performance Damped Assembly
- Best suited for: Home studios, media rooms, and party walls adjoining mechanical equipment.
- Assembly:
- Independent framing or heavy-duty resilient isolation clips (e.g., RSIC-1, GenieClip) on heavy structural studs.
- Deep air cavity (4" to 6" / 100–150 mm) filled with mineral wool insulation.
- Dual layers of 5/8" (15.9 mm) Type X gypsum board laminated together with a constrained-layer viscoelastic damping compound (such as Green Glue).
- Staggered, back-caulked gypsum joints and putty-padded electrical boxes.
- Added Thickness: 4.5" to 6.5" (115–165 mm).
- Main Limitation: Highest material and labor cost; structural flanking through unisolated ceilings/floors may still govern overall room noise.
Tip
Calculate steel studs, drywall sheets, isolation clips, and cavity insulation for your wall dimensions in our interactive soundproofing calculator.
5. Acoustic Floating Floors: Impact & Airborne Isolation
Impact noise from footfalls and dragging furniture travels as structural vibration through the floor slab. In multi-family dwellings, floating floor assemblies isolate this vibrational energy before it enters the building frame.
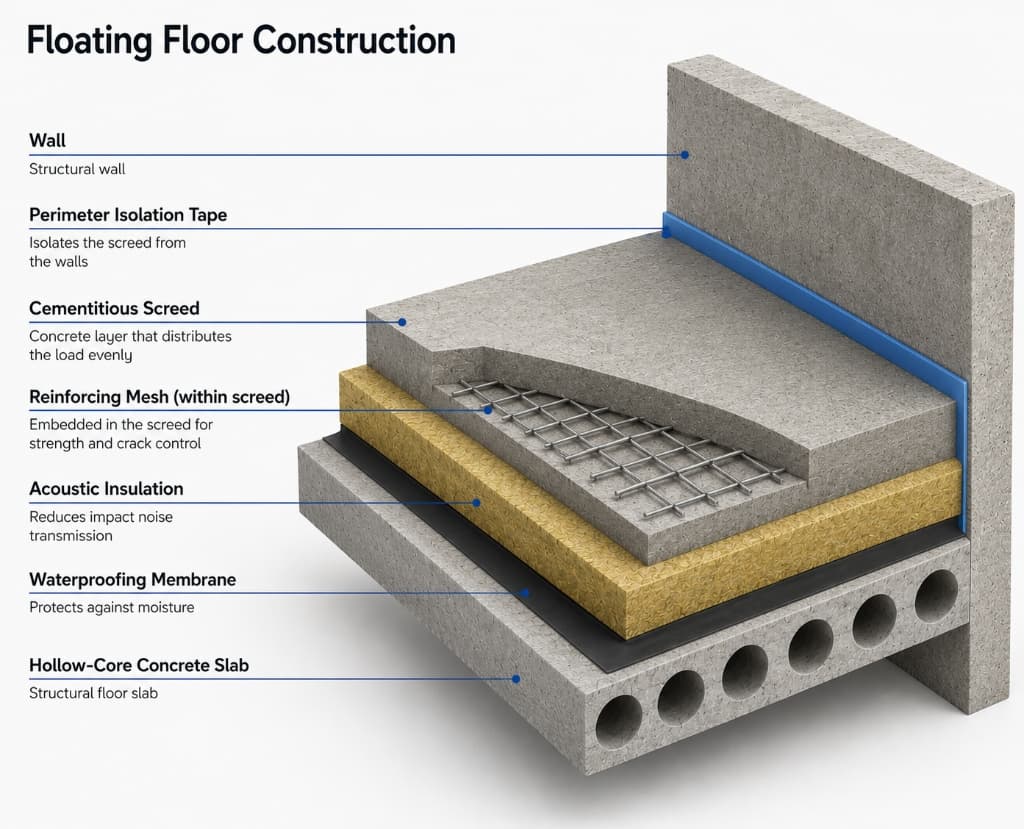
Layer-by-Layer Floating Floor Assembly (installation sequence from subfloor up):
- Hollow-Core Concrete Slab: Structural load-bearing concrete floor base, thoroughly cleaned and cleared of debris.
- Waterproofing Membrane: Heavy-duty 6 mil (150–200 µm) barrier protecting against moisture and slurry intrusion.
- Acoustic Insulation: High-density resilient mineral wool boards (100–140 kg/m³ or 6.2–8.7 lbs/cu ft) reducing impact noise transmission.
- Cementitious Screed: Minimum 2.0"–2.4" (50–60 mm) concrete layer that distributes the load evenly across the resilient core.
- Reinforcing Mesh (within screed): Welded wire grid embedded in the screed for tensile strength and crack control.
- Perimeter Isolation Tape: Closed-cell foam strip that isolates the screed from the walls, eliminating flanking paths.
- Wall: Structural perimeter wall.
Critical Floating Floor Jobsite Rules:
- Unbroken Perimeter Isolation: The floating screed or dry subfloor must never touch the perimeter walls, columns, or structural curbs. Closed-cell isolation tape must wrap every perimeter edge.
- No Mechanical Fasteners Bridging the Core: Screws, nails, or anchors driven through the floating layer into the subfloor create rigid mechanical short circuits that transmit vibration directly into the slab.
- Conduit Routing: Route conduits and plumbing pipes along the subfloor underneath or embedded in a lightweight leveling base before laying continuous acoustic boards. Slicing insulation boards into disconnected strips around conduits creates sound bridges.
- Baseboard Detailing: Fasten baseboard molding strictly to the wall studs. Maintain a 1/8" (3 mm) gap between the bottom of the baseboard and the finished floor, sealed with flexible acoustical sealant. Nailing baseboards into both wall and floor mechanically locks the floating slab to the structure.
Tip
Calculate the exact bill of materials (drywall sheets, mineral wool batts, studs, isolation clips, and sealant) using our interactive soundproofing calculator, and concrete leveling mix using our screed calculator.
6. Ceiling Acoustics: Airborne vs. Upstairs Footsteps
Remediating ceiling noise depends heavily on the nature of the sound:
- Source Control is King for Impact Noise: The most effective way to eliminate footfall noise is treating the floor above (high-performance underlayment under hardwood, floating screeds, or plush carpeting).
- Ceiling Treatment from Below: If you cannot access the upstairs unit, installing an isolated drop ceiling—using resilient isolation hangers (e.g., RSIC-1 / GenieClip), 3" (75 mm) mineral wool cavity insulation, and two layers of 5/8" Type X drywall—will substantially reduce airborne speech and dampen impact clicks. However, low-frequency structural thuds can still flank down adjoining drywall partitions and concrete walls.
7. Acoustic Materials: What Works vs. What Fails
To avoid wasted expenditure, understand the physical role of each material:
| Material | What It Is Good For | What It Is NOT Good For |
|---|---|---|
| Mineral Wool Batts | Cavity absorption; dampening internal resonance inside walls and joists. | Blocking sound by itself without heavy drywall facings. |
| Fiberglass Batts | Lightweight cavity absorption in standard stud depths. | Standalone isolation; raw mass. |
| 5/8" Type X Gypsum Board | Adding structural mass and low-cost barrier density. | Sound absorption or echo reduction inside the room. |
| Resilient Channels (RC-1) | Mechanical decoupling on single-stud walls when installed properly. | High-load installations; systems with poor screw-depth control. |
| Sound Isolation Clips (RSIC) | Robust, fail-safe decoupling on walls and ceilings; holds heavy dual drywall. | Thin assemblies where depth cannot exceed 1 inch. |
| Acoustical Sealant | Maintaining continuous airtight seals along perimeter joints and penetrations. | Bridging wide structural movement joints (>1/2"). |
| Mass-Loaded Vinyl (MLV) | Adding limp mass in compact spaces or wrapping noisy pipe stacks. | Replacing a decoupled frame or acting as a standalone solution. |
| PET Felt / Slat Panels | Controlling room reverberation, flutter echo, and vocal clarity. | Blocking neighbor noise through party walls. |
| Acoustic Foam Pyramids | High-frequency echo absorption in vocal booths. | Sound isolation; blocking sound transmission. |
| Expanded Polystyrene (EPS) | Thermal insulation. | Primary acoustic wall treatments (lacks fibrous absorption). |
8. Why Low-Frequency Bass is the Hardest Sound to Stop
Airborne speech (300–3,000 Hz) has short wavelengths (approx. 4 inches to 4 feet / 0.1 to 1.2 m) that are easily dampened by modest mass and standard cavity insulation.
In contrast, low-frequency bass from subwoofers or footfall impacts (30–100 Hz) produces wavelengths measuring 11 to 37 feet (3.4 to 11.3 meters).
- The Mass Law Limit: At low frequencies, simple mass is inefficient. Doubling the wall mass provides merely a theoretical 5 to 6 dB improvement.
- Mass-Air-Mass Resonance (f₀): Every double-leaf partition has a natural resonance frequency where sound passes through almost unhindered. If a wall cavity is too shallow, f₀ shifts directly into the bass range (60–100 Hz), exacerbating low-frequency noise transmission.
- The Solution: Mitigating low frequencies requires deep air cavities (4"+ / 100mm+), true mechanical decoupling, and high-mass damped layers.
9. 8 Fatal Jobsite Mistakes in Soundproofing
- Using Foam Panels or Slat Panels for Isolation: Installing acoustic foam or wood slat panels absorbs reflections inside your room, but has virtually zero impact on transmission loss through the wall to your neighbor.
- Rigidly Connecting Framing to Existing Walls: Screwing new metal or wood studs directly to a shared masonry or stud wall creates mechanical vibration bridges.
- Leaving Perimeter Gaps Unsealed: Failing to apply non-hardening acoustical sealant under perimeter tracks or around drywall edges allows sound to flank through air gaps.
- Unsealed Back-to-Back Electrical Outlets: Cutting outlet boxes in the same stud cavity on opposite sides of a party wall creates a direct hole through the assembly. Stagger boxes by at least 24" (600 mm) and seal with acoustic putty pads.
- Ignoring Doors as the Weakest Acoustic Link: Upgrading a party wall to STC 55 while keeping a standard hollow-core interior door (STC ~20–25) with a 1/2" (12 mm) undercut allows sound to easily bypass the partition. High-performance rooms require a solid-core door, perimeter acoustic gaskets, and an automatic drop-down bottom seal.
- Uninsulated Plastic Drainage Stacks (DWV Pipes): Thin-walled PVC and ABS plumbing risers radiate rushing wastewater noise into adjoining rooms. Wrap plastic drain stacks in Mass-Loaded Vinyl (MLV) with decoupled foam backing and use rubber-isolated pipe clamps before closing wall chases.
- Short-Circuiting Resilient Channels: Driving long drywall screws through resilient channels into the wood or steel studs behind locks the channel in place, completely destroying mechanical decoupling.
- Installing Floating Floors Without Perimeter Isolation: Pouring screed or laying underlayment hard against perimeter walls creates a direct vibration path into the building structure.
10. Assembly Comparison Guide
| Assembly Type | Approx. Added Thickness | Space Loss | Relative Cost | Best For | Main Limitation |
|---|---|---|---|---|---|
| Direct Resilient Channel Upgrade | 1.25"–1.75" (32–45 mm) | Low | Low-Medium | Speech noise reduction on existing studs | High risk of screw short-circuiting during installation |
| Independent Stud Wall with Insulation | 3.5"–5.0" (90–125 mm) | Moderate | Medium | Shared party walls in condos & apartments | Consumes 4–5 inches of room perimeter depth |
| Clip-Decoupled Dual Drywall with Damping | 4.5"–6.0" (115–150 mm) | Moderate-High | High | Media rooms, vocal studios, heavy noise | Higher material cost; perimeter flanking must be controlled |
| Floating Floor Assembly over Acoustic Mats | 2.5"–3.5" (65–90 mm) | Vertical headroom | Medium-High | Footfall impact isolation in gut renovations | Requires adequate ceiling clearance and threshold transitions |
Note: Laboratory ratings for specific assemblies can be referenced in the USG Design Studio, Gypsum Association GA-600 Fire & Sound Manual, and manufacturer technical catalogs.
11. Decorative Acoustic Finishes: Slat Wood Panels
In contemporary interior architecture, Acoustic Slat Wood Panels provide acoustic absorption while elevating room aesthetics.

Architectural Role:
- Room Absorption (NRC ~0.80–0.85): The dense recycled PET felt backing absorbs mid-to-high frequency reflections, reducing room reverberation and flutter echo.
- Aesthetic Integration: Natural oak and walnut veneers introduce warmth to media walls, bedrooms, and home offices.
- Clarification: Slat panels enhance internal sound clarity; they must be paired with decoupled wall assemblies if your objective is stopping noise transmission from neighbors.
12. Summary: What Actually Matters Most
When planning residential soundproofing, prioritize investments according to acoustic engineering hierarchy:
- Mechanical Decoupling: Breaking the physical connection between structural leaves is the single most effective method to increase transmission loss.
- Airtightness & Perimeter Sealing: Eliminating air leaks via flexible acoustical sealant prevents sound flanking.
- Mass: Utilizing heavy, dense sheathing (5/8" Type X drywall or gypsum fiberboard) reflects sound energy.
- Cavity Depth & Absorption: Deeper cavities filled with fibrous mineral wool or fiberglass (30–60 kg/m³ / 2.0–4.0 lbs/cu ft) absorb internal resonance.
- Flanking Path Control: Mitigating sound travel through continuous subfloors, hollow-core doors, plumbing chases, and ductwork.
- Correct Jobsite Workmanship: Ensuring fasteners do not short-circuit resilient clips or channels.
- Selection of Tested Assemblies: Building to verified laboratory specifications (UL, ASTM, ISO) rather than relying on unverified claims.
❓ Frequently Asked Questions
Can I soundproof an apartment using thin 1/2-inch (12 mm) stick-on foam or vinyl?
No. Sound transmission loss requires mass, cavity depth, and mechanical decoupling. Thin surface materials only provide high-frequency absorption within the room; they do not possess the mass or air volume required to block transmission through a structural partition.
Will an acoustic ceiling completely eliminate footstep noise from upstairs?
An isolated ceiling built with resilient clips and multi-layer drywall substantially reduces airborne sound and dampens direct impact clicks. However, heavy low-frequency footstep thuds will still travel down continuous perimeter walls via flanking transmission unless the floor above is properly isolated at the source.
What is the difference between STC and Rw?
STC (ASTM E90/E413) is the North American standard measuring transmission loss across 125–4,000 Hz. Rw (ISO 717-1) is the international metric covering 100–3,150 Hz. While numerical values are often similar, they utilize different frequency curves and calculation methodologies.
Why is non-hardening acoustical caulk required instead of standard silicone or expanding foam?
Standard polyurethane expanding foam cures into a rigid cell structure that acts as an acoustic bridge. Standard painter's caulk shrinks and dries brittle over time. Acoustic sealants remain permanently flexible and non-shrinking, maintaining an airtight barrier through building settlement.
What is the proper construction sequence for a full-room soundproofing retrofit?
- Pour the floating floor screed on perimeter isolation tape.
- Frame independent wall assemblies standing on the perimeter-isolated floor.
- Install the decoupled ceiling assembly on resilient isolation hangers.
- Seal all perimeter junctions and backboxes with acoustical sealant and putty pads.
Calculate soundproofing before starting finish work
Start with the main calculator, then use the two tools that most naturally follow this article.
This piece is structured as a practical sequence of work, material choices, and decisions without extra steps.